UI 脚本的生命周期及事件说明
阅读本文大概需要 5 分钟
UI 脚本中基础的生命周期事件
onStart() : void
- 当脚本被实例后,会在第一帧更新之前调用 onStart 函数
- 编辑器在为任何脚本调用 onUpdate 等函数之前,将在所有脚本上调用 onStart 函数
示例:
ts
/** 仅在游戏时间对非模板实例调用一次 */
    protected onStart() {
    }
/** 仅在游戏时间对非模板实例调用一次 */
protected onStart() {
}onUpdate(dt : number) : void
- 编辑器会在游戏每帧调用一次 onUpdate 函数,这是用于帧更新的主要函数
- 其中(dt : number)为时间差值,表示当前帧与上一帧的延迟 / 秒
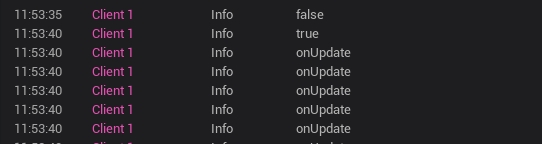
- onUpdate 函数由 canUpdate 控制,默认为关闭,需要手动设置 canUpdate 为 true 才能调用 onUpdate 函数
示例:
ts
/** 仅在游戏时间对非模板实例调用一次 */
    protected onStart() {
        //5s后设置为开启每帧触发onUpdate,默认情况下不调用onUpdate函数
        console.log(this.canUpdate)
        setTimeout(() => {
            this.canUpdate = true;
            console.log(this.canUpdate)
        }, 5000);
    }

    /**
    * 每一帧调用
    * 通过canUpdate可以开启关闭调用
    * dt 两帧调用的时间差,毫秒
    */
    protected onUpdate(dt :number) {
        console.log("onUpdate")
    }
/** 仅在游戏时间对非模板实例调用一次 */
protected onStart() {
//5s后设置为开启每帧触发onUpdate,默认情况下不调用onUpdate函数
console.log(this.canUpdate)
setTimeout(() => {
this.canUpdate = true;
console.log(this.canUpdate)
}, 5000);
}
/**
* 每一帧调用
* 通过canUpdate可以开启关闭调用
* dt 两帧调用的时间差,毫秒
*/
protected onUpdate(dt :number) {
console.log("onUpdate")
}
onDestroy(): void
脚本存在的最后一帧执行完,且在 OnUpdate 函数执行完毕后,调用此函数
示例:
ts
/** 仅在游戏时间对非模板实例调用一次 */
    protected onStart() {
        let behavior=findUIBehaviour(this.uiWidgetBase)
        behavior.destroy()
    }

    /**
    * 构造UI文件成功后,UI对象再被销毁时调用
    * 注意:这之后UI对象已经被销毁了,需要移除所有对该文件和UI相关对象以及子对象的引用
    */
    protected onDestroy() {
        console.log("destroy")
    }
/** 仅在游戏时间对非模板实例调用一次 */
protected onStart() {
let behavior=findUIBehaviour(this.uiWidgetBase)
behavior.destroy()
}
/**
* 构造UI文件成功后,UI对象再被销毁时调用
* 注意:这之后UI对象已经被销毁了,需要移除所有对该文件和UI相关对象以及子对象的引用
*/
protected onDestroy() {
console.log("destroy")
}UI 脚本中其他的生命周期事件
onAwake(): void
在 onStart 函数调用之前,编辑器会先调用一次此函数
示例:
ts
/**
     * 场景创建时或prefab实例化时调用,仅执行一次
     * 在onStart函数调用之前
     */
    protected onAwake() {
        console.error("UI Has Create==")
    }
/**
* 场景创建时或prefab实例化时调用,仅执行一次
* 在onStart函数调用之前
*/
protected onAwake() {
console.error("UI Has Create==")
}onAdded(): void
当 UI 添加到 canvas 的时候会触发这个 UI 的 onAdd()函数
示例:
ts
/**
     * 构造UI文件成功后,onStart之后
     * 对于UI的根节点的添加操作,进行调用
     * 注意:该事件可能会多次调用
     */
    protected onAdded() {
        console.error("UI Has Add To Canvas==")
    }
/**
* 构造UI文件成功后,onStart之后
* 对于UI的根节点的添加操作,进行调用
* 注意:该事件可能会多次调用
*/
protected onAdded() {
console.error("UI Has Add To Canvas==")
}onRemoved(): void
每次 UI 对象中动态移除组件后都会调用此函数,目前只能调用 ui 的 destroyObject 达到 remove 的效果
示例:
ts
/**
     * 构造UI文件成功后,onAdded之后
     * 对于UI的根节点的移除操作,进行调用
     * 注意:该事件可能会多次调用
     */
    protected onRemoved() {
        console.error("UI Has Remove From Canvas==")
    }
/**
* 构造UI文件成功后,onAdded之后
* 对于UI的根节点的移除操作,进行调用
* 注意:该事件可能会多次调用
*/
protected onRemoved() {
console.error("UI Has Remove From Canvas==")
}图中执行顺序为 onAwake-创建 UI -> onAdded-添加 UI 到 canvas -> onRemoved-执行 UI 的 destroyObject()

onShow(...params: any[]): void
当 UI 通过 UIService.instance 创建和展示的时候 会先调用 onAdd() 再调用 onShow
示例:
ts
/**
     * 设置显示时触发,手动设置显示或者UIService调用show时触发
     */
    protected onShow(): void {
        console.error("UI Has OnShow==")
    }
/**
* 设置显示时触发,手动设置显示或者UIService调用show时触发
*/
protected onShow(): void {
console.error("UI Has OnShow==")
}onHide(...params: any[]): void
当 UI 通过 UI.UIManger.instance 创建和隐藏的时候 会调用 onHide
示例:
ts
/**
     * 设置显示时触发,手动设置显示或者UIService调用show时触发
     */
    protected onHide(): void {
        console.error("UI Has OnHide==")
    }
/**
* 设置显示时触发,手动设置显示或者UIService调用show时触发
*/
protected onHide(): void {
console.error("UI Has OnHide==")
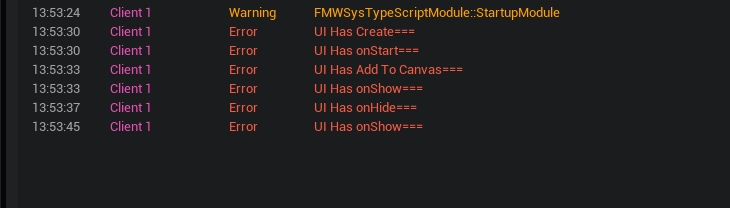
}下图调用顺序为 UIService.instance 内函数方法: onAwake-创建 UI -> OnShow-使用 showUI 函数 ->OnHide-使用 hideUI 函数 >OnShow-使用 showUI 函数
输入事件
onTouchStarted(InGemotry: Geometry, InPointerEvent: PointerEvent): EventReply
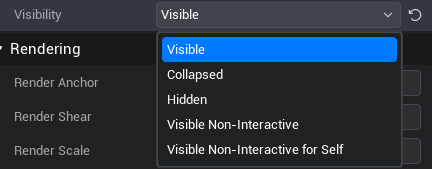
当 UI 界面被设置为 visible 时可以接收点击 UI 界面的 touch 事件
示例:
ts
/**
     * 当这个UI界面是可以接收事件的时候
     * 手指或者鼠标触发一次Touch时触发
     * 返回事件是否处理了
     * **如果处理了,那么这个UI界面可以接收这次Touch后续的Move和End事件**
     *** 如果没有处理,那么这个UI界面就无法接收这次Touch后续的Move和End事件**
     */
    protected onTouchStarted(InGemotry :Geometry,InPointerEvent:PointerEvent) :EventReply{
        console.error("UI Has onTouchStarted===")
        return EventReply.handled; //EventReply.unHandled
    }
/**
* 当这个UI界面是可以接收事件的时候
* 手指或者鼠标触发一次Touch时触发
* 返回事件是否处理了
* **如果处理了,那么这个UI界面可以接收这次Touch后续的Move和End事件**
*** 如果没有处理,那么这个UI界面就无法接收这次Touch后续的Move和End事件**
*/
protected onTouchStarted(InGemotry :Geometry,InPointerEvent:PointerEvent) :EventReply{
console.error("UI Has onTouchStarted===")
return EventReply.handled; //EventReply.unHandled
}onTouchMoved(InGemotry: Geometry, InPointerEvent: PointerEvent): EventReply
当 UI 界面被设置为 visible 时在 UI 界面滑动会执行此事件
示例:
ts
/**
     * 手指或者鼠标在UI界面上移动时
     */
    protected onTouchMoved(InGemotry :Geometry,InPointerEvent:PointerEvent) :EventReply{
        console.error("UI Has onTouchMoved===,"+InPointerEvent.getScreenSpacePosition())
        return EventReply.handled
    }
/**
* 手指或者鼠标在UI界面上移动时
*/
protected onTouchMoved(InGemotry :Geometry,InPointerEvent:PointerEvent) :EventReply{
console.error("UI Has onTouchMoved===,"+InPointerEvent.getScreenSpacePosition())
return EventReply.handled
}onTouchEnded(InGemotry: Geometry, InPointerEvent: PointerEvent): EventReply
当 UI 界面被设置为 visible 时抬起手指时会触发 end 函数
示例:
ts
/**
     * 手指或者鼠标离开UI界面时
     */
    protected onTouchEnded(InGemotry :Geometry,InPointerEvent:PointerEvent) :EventReply{
        console.error("UI Has onTouchEnded===")
        return EventReply.handled; //EventReply.unHandled
    }
/**
* 手指或者鼠标离开UI界面时
*/
protected onTouchEnded(InGemotry :Geometry,InPointerEvent:PointerEvent) :EventReply{
console.error("UI Has onTouchEnded===")
return EventReply.handled; //EventReply.unHandled
}
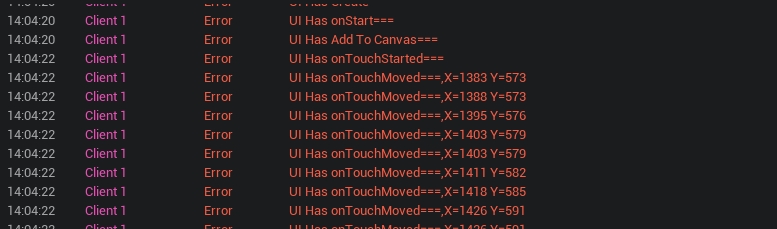
下图调用顺序为 : onTouchStarted-手指或鼠标按下 -> onTouchMoved-手指或鼠标滑动 ->onTouchEnded-手指或鼠标释放
onMouseEnter(InGemotry :Geometry,InPointerEvent:PointerEvent) :EventReply
当鼠标进入此 UI 范围内时会触发此函数
示例:
ts
/**
     * 当鼠标进入此UI范围内时会触发此函数
     */
    protected onMouseEnter(InGemotry :Geometry,InPointerEvent:PointerEvent) :EventReply{
        console.error("UI Has onMouseEnter===")
        return EventReply.handled; //EventReply.unhandled
    }
/**
* 当鼠标进入此UI范围内时会触发此函数
*/
protected onMouseEnter(InGemotry :Geometry,InPointerEvent:PointerEvent) :EventReply{
console.error("UI Has onMouseEnter===")
return EventReply.handled; //EventReply.unhandled
}onMouseLeave(InPointerEvent:PointerEvent) :EventReply
当鼠标离开此 UI 的范围时会触发此函数
示例:
ts
/**
     * 当鼠标离开此UI 的范围时会触发此函数
     */
    protected onMouseLeave(InPointerEvent:PointerEvent) :EventReply{
        console.error("UI Has onMouseLeave===")
        return EventReply.handled; //EventReply.unhandled
    }
/**
* 当鼠标离开此UI 的范围时会触发此函数
*/
protected onMouseLeave(InPointerEvent:PointerEvent) :EventReply{
console.error("UI Has onMouseLeave===")
return EventReply.handled; //EventReply.unhandled
}onMouseWheel(InGemotry :Geometry,InPointerEvent:PointerEvent) :EventReply
在此 UI 上面滑动鼠标滚轮会执行此函数
示例:
ts
/**
     * 在此UI上面滑动鼠标滚轮会执行此函数
     */
    protected onMouseWheel(InGemotry :Geometry,InPointerEvent:PointerEvent) :EventReply{
        console.error("UI Has onMouseWheel===")
        return EventReply.handled; //EventReply.unhandled
    }
/**
* 在此UI上面滑动鼠标滚轮会执行此函数
*/
protected onMouseWheel(InGemotry :Geometry,InPointerEvent:PointerEvent) :EventReply{
console.error("UI Has onMouseWheel===")
return EventReply.handled; //EventReply.unhandled
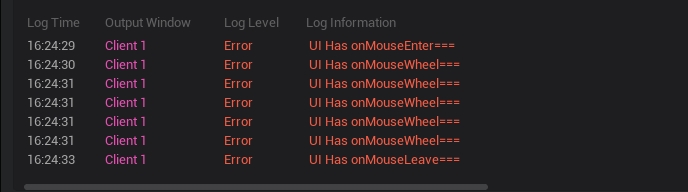
}下图调用顺序为 : onMouseEnter-鼠标进入此 UI 范围内 -> onMouseWheel-滑动鼠标滚轮 ->onMouseLeave-鼠标离开此 UI 范围内